Articles
Drum Solo
Simulating a live drum solo
by Bruce Bartlett, Copyright 2011
Suppose you just recorded a band in a club to create a live album. A few days after the gig, the drummer asks, “Can I play a drum solo in your studio, and have you add it to the album? I want it to sound ‘live’, as if I played it at the gig.”
That happened to me. We recorded a drum solo in the studio, then edited it onto the beginning of one of the live-recorded songs. People listening to the final CD thought that the solo was part of the set.
I'll offer some suggestions on how to simulate a live, in-the-venue drum solo after the fact. The techniques described here also apply to overdubbing other musical parts in the studio to replace flawed live performances.
Here's the basic procedure:
- In the studio, try to duplicate the miking setup that you used live. Match the microphone models and placement.
- Record the instrument in a dry, neutral studio if possible.
- Then add some artificial reverb that sounds like the live venue's reverb. Set the reverb parameters to re-create your memory of the venue's reverb time, degree of warmth, and so on.
- Enhance the tracks with EQ, gating and compression as needed.
- Add crowd noise and applause.
I put some mp3 samples of the recorded drum solo in this article so you can click on them and hear the results. If your playback stutters, right-click the samples to download them first, then play them. For the best sound, play the samples through your studio monitor speakers.
The finished mix
Let's listen to the studio-recorded drum solo after it has been enhanced to sound “live”:
As you can hear, we added some crowd reaction and reverb to the dry studio tracks in order to simulate a live recording.
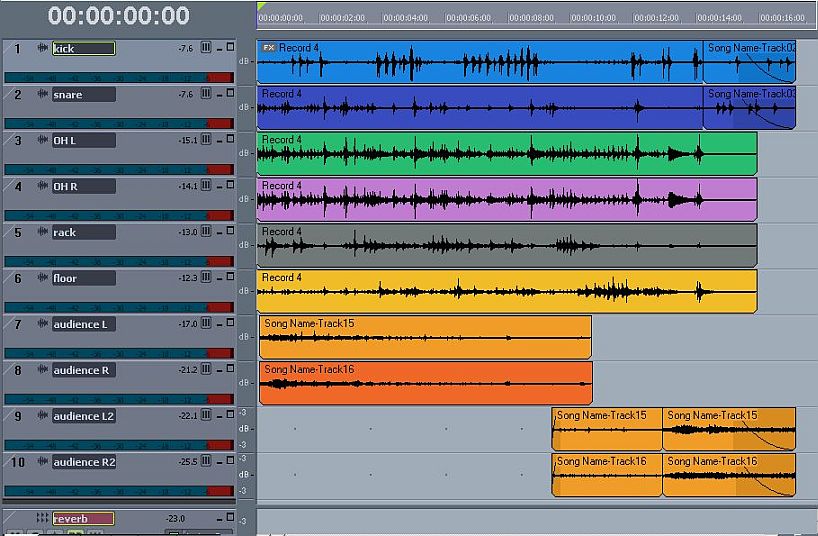
Below is a screen shot of the drum-solo tracks. From top to bottom, the tracks are:
- Kick
- Snare
- Overhead left
- Overhead right
- Rack tom
- Floor tom
- Audience reaction, left and right mic signals
- A different audience reaction, left and right mic signals
There's also a reverb plug-in inserted into a stereo bus. The snare and toms have sends to that reverb bus.
The studio mix without processing
Now let's break down the mix so you can hear how it was put together. First, here's a mix of the studio drum solo without any EQ or effects:
The sound is not too exciting, is it? Let's work on one track at a time.
Kick
This is the raw sound of the kick-drum track – with no EQ and no gating:
You can hear some leakage into the kick-drum mic, and the kick lacks punch. I added some EQ and gating as shown below. Here's the result:
The EQ and gate settings are shown below:
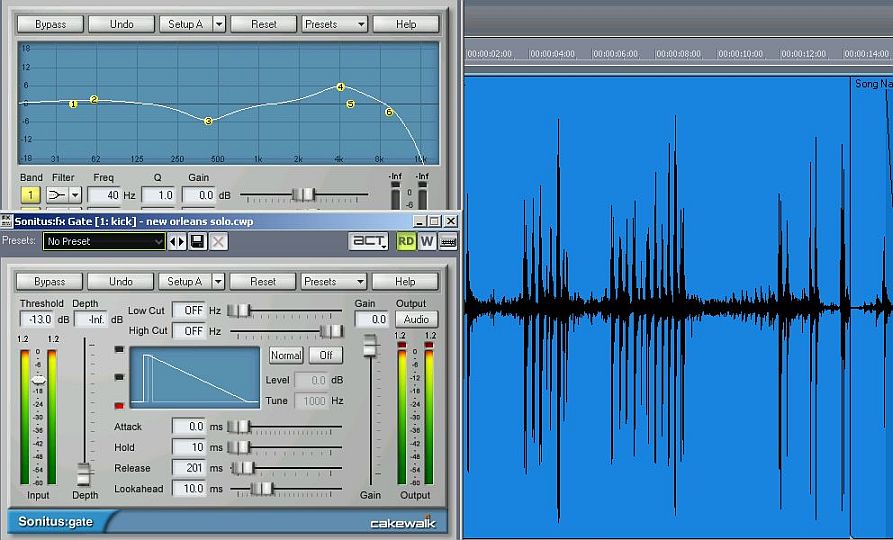
It's common to cut around 400 Hz on a kick-drum signal to remove the “papery” sound and to tighten the beat. I also added some beater click at 4 kHz, and brought up the low end slightly. The gate threshold was set to pass the kick drum but remove most of the leakage.
Snare
Let's move on to the snare drum. It lacked clarity and sounded kind of puffy:
The EQ shown below really helped to define the snare sound.

Some cut around 600 Hz, a shelving boost above 4 kHz, and a little peaking EQ boost at 195Hz made the snare drum sound more “expensive”. Of course, that EQ might not work with a different snare drum.
Rack tom
As you can hear in the sample below, the rack tom and floor tom mics picked up a lot of leakage, and the toms lacked punch:
Again, some gating and EQ helped those problems:
Shown below are the gate and EQ settings for the rack tom.
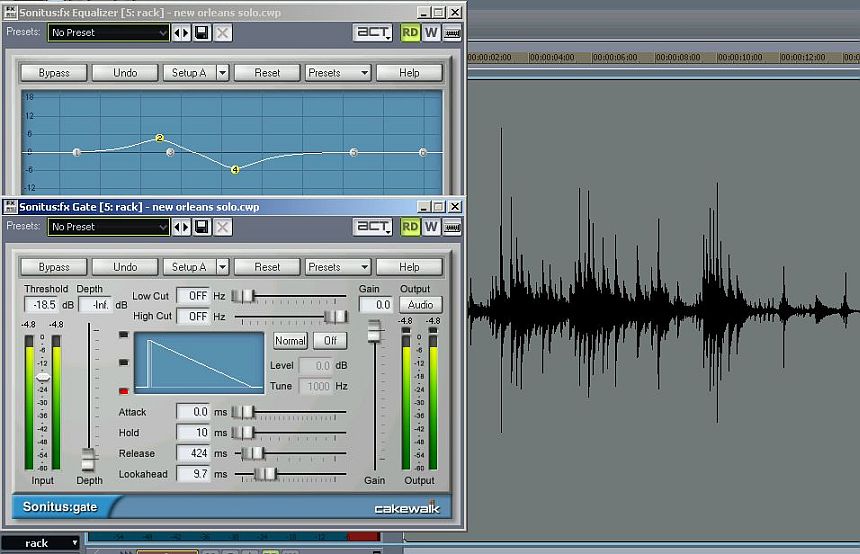
A cut around 600 Hz is fairly typical for toms. A low-end boost brought out the tone of the drum. I set the gate release time long enough to hear the tom-tom ringing.
With the overhead mics, I wanted to pick up mostly just the cymbals, so I rolled off everything below 500 Hz.
The mix with reverb and effects
Now that the sound of the drums was improved, we needed some reverb to simulate the original venue. I set up a reverb plug-in with 0.4 second reverb time, and inserted a reverb send in the snare and toms tracks. Here is the result:
Reprise: The finished mix
Those drums are really starting to sound live, but one vital ingredient is missing: the audience reaction. I had recorded some applause and yelling at the end of each song. As shown below, I copied and pasted some of that under the drum solo in the bottom four tracks:

And this was the final result:
Adding some crowd reaction works amazingly well to simulate a live event. I hope you enjoyed hearing and seeing how this “simulated live” recording came together.
Gospel
Recording and mixing an energetic gospel song
by Bruce Bartlett, Copyright 2011
One of the most memorable events in The Blues Brothers movie is the scene where a church congregation dances to the gospel band. The dancers do insanely high flips and cartwheels to this exuberant, joyful music.
I was honored to make a studio recording of similar music played by a top local gospel band, the Mighty Messengers. If your house of worship has a praise band who wants to record a CD, the tips in this article might help.
The recording
On the day of the session, we set up a drum kit in the middle of the studio. Surrounding the drummer were two electric guitarists, a bass player, a keyboardist and a singer who sang scratch vocals.
Because the bass, guitars and keys were recorded direct, there was no leakage from the drum kit, so we got a nice, tight drum sound. I miked each part of the kit. Kick was damped with a blanket and miked inside near the hard beater. We recorded the guitars off their effects boxes, so we captured the effects that the musicians were playing through.
I set up a cue mix so the band members could hear each other over headphones. We recorded on an Alesis HD24XL 24-track hard-drive recorder, which is very reliable and sounds great. Most of the songs required only one or two takes — a testament to the professionalism of this well-rehearsed band.
A few days later after mixing the instrument tracks, we overdubbed three background harmony singers (each on a separate mic). Finally we added the lead vocalist.
The mixdown
I copied all the tracks to my computer for mixing with Cakewalk SONAR Producer, a DAW which I like for its smooth workflow, top-quality plugins and 64-bit processing.
Shown below is a typical multitrack screen of the project:

Figure 1. The tracks in the project.
Here's a short sample of the mix of “My Heavenly Father” (written and copyrighted 2010 by Dr. William Jones). If your computer's mp3 player skips, right-click the mp3 file to download it before playing. For the best sound, play the samples through your studio monitor speakers.
Let's break it down. Click on each mp3 file below to hear the soloed tracks without any effects, then with effects.
First, the bass track.
To reduce muddiness and enhance definition in the bass track, I cut 5 dB at 250 Hz and boosted 6 dB at 800 Hz. Then the bass track sounded like this:
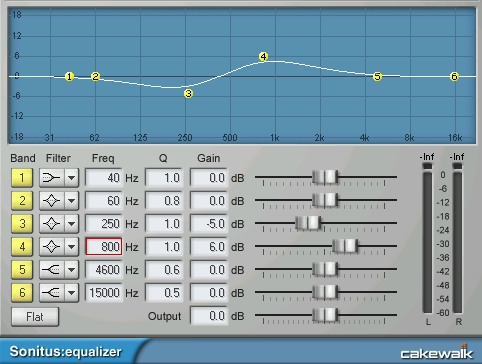
Figure 2. EQ used on the bass guitar.
Note that this EQ was done with all the instruments playing in the mix. EQ can sound extreme when you hear a track soloed, but just right when you hear everything at once.
Next, the kick-drum track.
To get a sharp kick attack that punched through the mix, I applied -3 dB at 60 Hz, -6 dB at 400 Hz, and +4 dB at 3 kHz. Here's the result:
Thinning out the lows in the kick ensured that the kick did not compete with the bass guitar for sonic space.
Now the snare track:
I boosted 10 dB at 10 kHz to enhance the high hat leakage into the snare mic. This is extreme but was necessary in this case. I also added reverb with a 27 msec predelay and 1.18 sec reverb time. Finally, I compressed the snare with a 7:1 ratio and 1 msec attack to keep the loudest hits under control.
The drummer did not play his toms on this song. But on other songs, to reduce leakage, I deleted everything in the tom tracks except the tom hits (see Figure 1). Cutting a few dB at 600 Hz helped to clarify the toms.
Next, here's the cymbal track unprocessed. Notice how loud the snare leakage is relative to the cymbal crash.
To reduce the snare leakage into the cymbal mics, I limited the cymbal track severely. The limiting reduced the snare level without much affecting the cymbal hits. This is very unusual processing but it worked. Listen to the cymbal-to-snare ratio with limiting applied.
The guitars sounded great as they were… a little reverb was all that was needed. These two players should do a solo album!
The keyboards also needed only slight reverb.
Moving on to the background vocals, we recorded three singers with three large-diaphragm condenser mics. Here are the raw tracks with the vocals panned half-left, half-right and center:
We applied 3:1 compession and added a low-frequency rolloff to compensate for the mics' proximity effect. I “stacked” the vocal tracks, not by overdubbing more vocals, but by running the vocal tracks through a chorus plug-in. This effect doubled the vocals, making them sound like a choir — especially with a little reverb added. Here are the background vocals with compression, EQ, chorus and reverb:
Finally, here's the unprocessed lead-vocal track. Listen how the word “never” is very loud because it is not compressed:
To tame the loud notes I added 4:1 compression with a 40 msec attack. Figure 3 shows the settings.
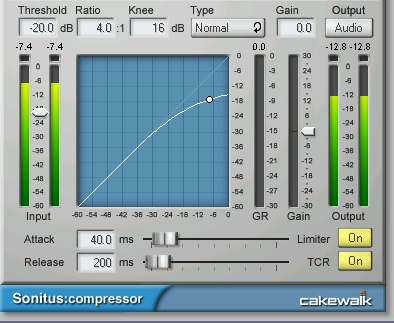
Figure 3. Settings for the lead-vocal's compressor.
The track also needed a de-esser to reduce excessive “s” and “sh” sounds. To create a de-esser, I used a multiband compressor plug-in, which was set to limit the 4 kHz-to-20 kHz band with a 2 msec attack time. This knocks down the sibilants only when they occur. De-essing does not dull the sound as a high-frequency rolloff would do.
Click on the mp3 file below to hear the lead vocal with compression, de-essing and reverb. The word “never” is not too loud now, thanks to the compressor.
The completed mix
We're done. Here's the entire mix again without any processing:
And here's the same mix with all the processing just described:
As we said earlier, we recorded the electric guitars playing through their effects stomp boxes, so I didn't need to add any effects to them. Those players knew exactly what was needed. For example, here's another song mix that showcases the slow flanging on the right-panned guitar. It was written and copyrighted 2010 by Dr. William Jones. By the way, this song is in 5/4 and 7/4 time.
Of course, every recording requires its own special mix, so the mix settings given here will not necessarily apply to your recordings. But I hope you enjoyed hearing how a recording of this genre might be recorded and mixed.
Hip Hop
Deconstructing a hip hop mix
by Bruce Bartlett, Copyright 2011
Let's look at a typical hip-hop mix and break it into its elements. That way we can see and hear how the mix comes together from the musical pieces.
A rap or hip-hop mix typically has these tracks as a minimum:
- The “track” or the “beat.” This is the instrumental backup. It might be downloaded from a website, created in the studio, purchased from a production house, or whatever.
- The lead vocal (often doubled in spots).
- Ad libs (“Hey”, etc.)
- Effected ad libs (which are changed in pitch, pitch-corrected, stereoized, etc.)
- Chorus and doubled chorus vocals panned left and right.
- Sound effects (applause, gunshots, etc.)
In many hip-hop songs, the instrumental track for the verses and choruses is the same — unlike in a pop song where the chords change during the chorus. Still, the lyrics are repeated in each chorus whether in hip-hop or a pop song.
With this knowledge in mind, let's examine a portion of the complete mix. Here's a screen capture:
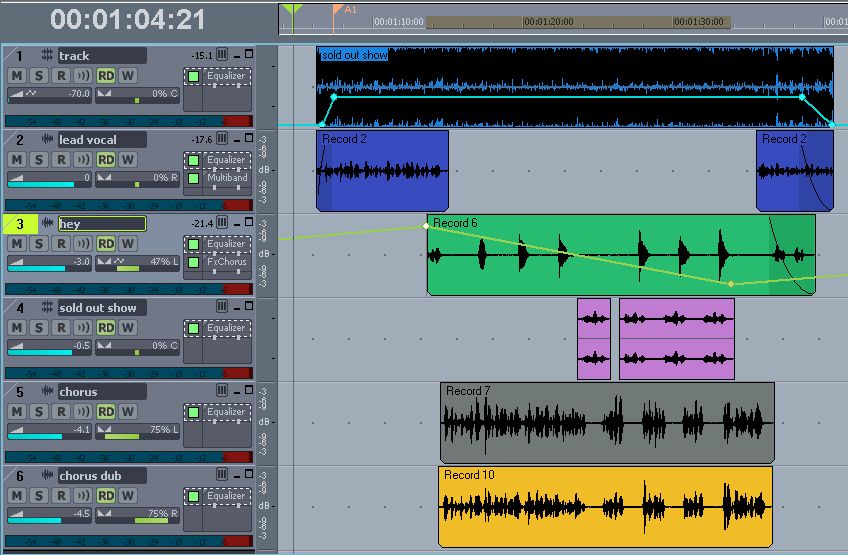
From top to bottom, the tracks are:
- The instrumental “track”. As you can see, it's already been maximized by the composer.
- Lead vocal.
- “Hey” repeated several times (an ad lib).
- The lyrics “Sold out show” repeated several times (an ad lib).
- and 6. Chorus vocal panned left and chorus vocal dub panned right.
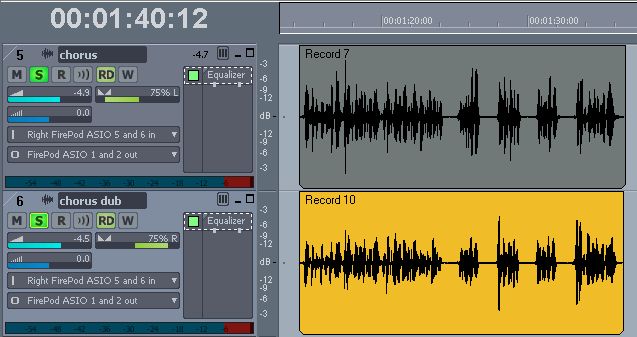
Note that the clips or regions are already trimmed to remove noises during pauses. This also makes it easy to see where the chorus vocals are in the song. You can export a stereo mix of just the chorus vocals, then import that chorus vocal mix at each place in the song where the choruses occur. That way the performers don't need to repeat the performance each time.
Listen to the complete mix of the song section shown above:
If the playback stutters, right-click the link and download the sample. For the best sound, play the samples through your studio monitor speakers.
The Track
Let's break it down. First we'll examine the stereo instrumental track or beat by itself, along with an EQ plug-in inserted in the track. This track's percussion sounded a little harsh so I cut 3 dB at 7 kHz.
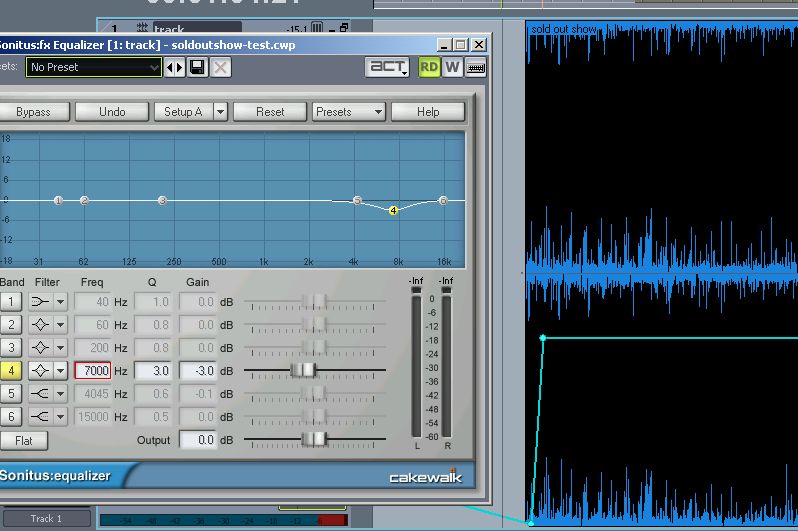
Click here to audition a few seconds of the track or beat, soloed:
Lead vocal
The lead vocal was mixed dry to keep it clear and up-front. The only EQ needed on the vocal track was a low-end rolloff to reduce the mic's proximity effect.
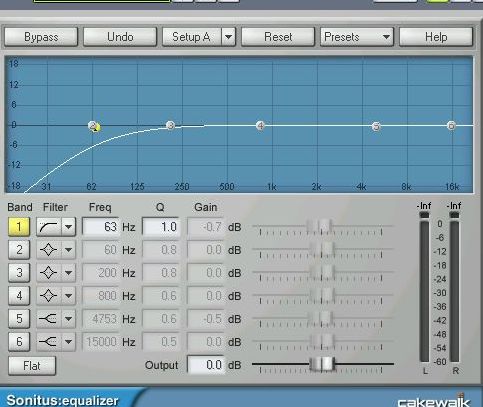
Vocal EQ
I also used a multiband compressor set up as a de-esser to tame excessive siblilants (below right). Only the highs above 4kHz were limited:
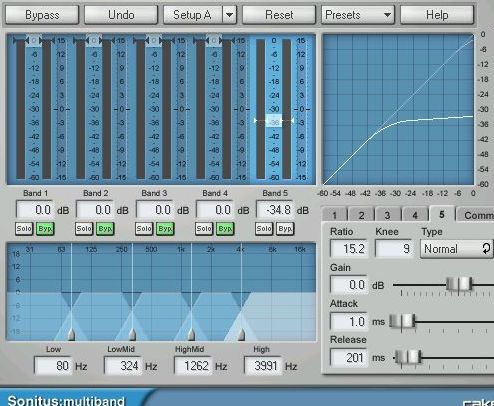
Vocal de-essing
After this processing, the soloed lead vocal sounded like this:
Ad lib: “Sold out show"
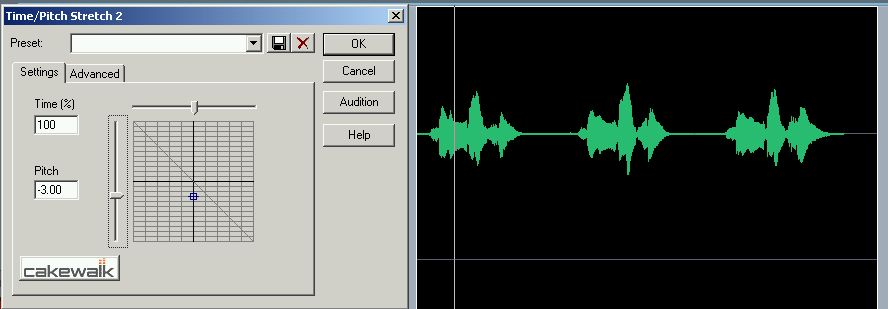
After recording this track, I had fun lowering its pitch without slowing down the tempo. An MPX time-pitch-stretch plug-in did the job. Below left is the Time/Pitch stretch 2 plug-in with the pitch lowered 3 half-steps. Below right is the waveform of the phrase “sold out show” repeated three times.
And here's how it sounded:
Ad lib: “Hey”
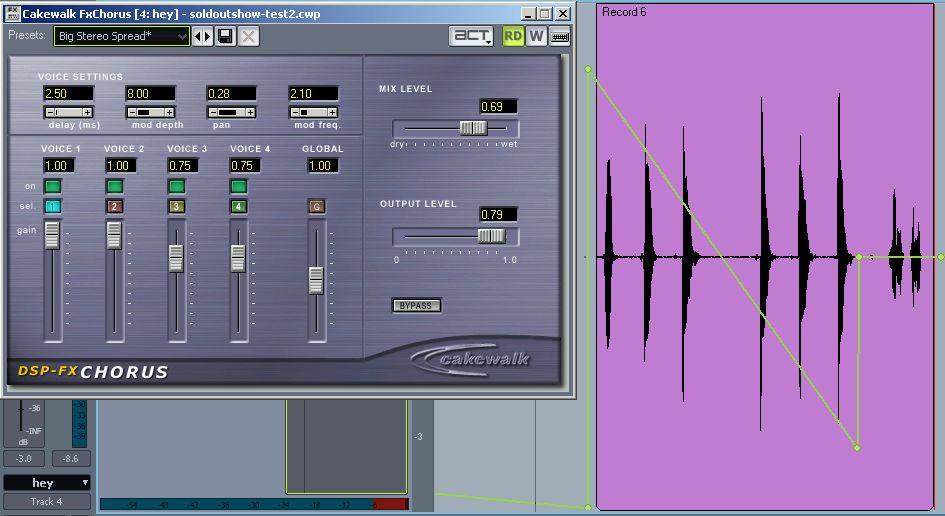
What's cool about this track is the automated panning. The repeated “hey” waveforms are visible below right, and you can see the envelope (diagonal line) that shifted the panning from left to right as the track played. Below left, a chorus plug-in added some life, too.
Click here to listen to the automated panning and chorus on the “hey” track.
Chorus vocals
Finally I recorded the vocal for the chorus and panned it left. Another chorus vocal was overdubbed and panned right to create a stereo effect. The pan settings are shown below as 75% L and 75% right.
Here's the sound of the left-panned chorus vocal:
And here are the stereo-panned chorus vocals:
Let's give a listen to all the vocal parts mixed together, without the instrumental track:
Reprise: the complete mix
Now that you've seen and heard all the parts of the mix, here's the whole shebang again.

…which sounds like this:
Most likely, you can hear all the elements in the mix better than when we started.
Sound effects
At the end of the song, the artist wanted to bring in some applause. I had captured some during a live recording a few weeks ago with an N.O.S. stereo pair, and we used that. I imported a clip of applause (called “crowd end” here) and placed it near the end of the song. The clip faded up as the music faded out.

Here's the end of the song with the crowd noise:
I hope that these screen captures and sound clips have demonstrated one way that a hip-hop mix can be created. Some commercially released songs are much more complex, endlessly striving to delight the ear.
Music and lyrics, Copyright 2009 by Artavis Hardy (a.k.a. Coltre). The producer of the music track is Carl McCardle (Skyblue).
Home Recording
Fixing and mixing a musician's home recording
by Bruce Bartlett, Copyright 2011
“We can't afford to record in your studio, so we'll record at home and you can mix it”. Sound familiar?
In a tough economy, an increasing number of musicians don't have the money to spend several days or weeks in a studio at the hourly rate. What's more, a lot of artists need time to develop sonic ideas by trial and error, and can't afford to do that on studio time.
Some performers shun the studio for other reasons. “I get too nervous in the studio… I'll just record myself with a portable recorder and let you overdub the other instruments.”
Many musicians own DAW setups — or flash recorders — and can do their own tracking at home. But some lack the expertise and equipment to make clean recordings in the first place. They might hand you a load of barely usable tracks, and expect you to make them sound good.
While a number of musicians have mastered recording skills and can produce great-sounding tracks, some don't know what they're doing. They need your help. If you want to put your name on their album or demo, you want to work with them so they'll record the cleanest tracks possible. Then you'll spend less time fixing sonic errors and more time being creative.
We'll look at two approaches to improve the end product:
- teach your customers how to record at home effectively
- use plug-ins and editing to improve their recordings.
Offer Advice to Record-at-Home Musicians: Talk with your clients to make sure they can supply you clean tracks. Try to find out their skill level so you don't insult them by telling them stuff they already know.
The advice you give home recordists is the same as you'd give to a novice recording engineer in a pro studio. You can discuss the following points wth the band members, or simply give them this article to read.
First tell your customer that it's difficult or impossible to remove reverb, compression and distortion, so make sure to keep those under control. The same goes for background noise. I'll describe specifically how to keep a handle on those problems.
Listed below are some suggestions for musicians to follow when recording. These tips apply both to 2-track and multitrack recordings.
Get rid of noise sources: Turn off the furnace or air-conditioning when you record. Maybe record in the basement — it tends to be quiet because it's surrounded by earth and cement blocks. Wait for trains and planes to pass. Seal cracks under doors with towels; maybe cover windows temporarily with plywood sheets. Have an electric guitarist rotate or move around to find a spot where hum stops.
Improve room acoustics: Hang some mattress foam, packing blankets, sleeping bags or comforters on the walls or on mic-stand booms. Put a roll of fiberglass insulation in each room corner to act as a bass trap. Or buy some pressed fiberglass panels and put one across each corner. One source is www.atsacoustics.com.
Mike fairly close: If you place a mic or stereo recorder too far from the instruments, it will pick up lots of muddy-sounding room acoustics which can't be removed in the mix. Try to stay no farther than 1 foot from the mics or recorder.
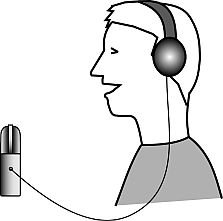
Figure 1. A singer/guitarist is close to the recorder to reduce pickup of room acoustics.
Don't clip the signal: Check the recording levels not only during regular playing, but also during loud accents. Aim for -6 dB maximum level on peak-reading level meters. Some keyboard patches are louder than others — try all of them when setting levels.
Monitor the recording: Put on headphones and listen to what the mics are picking up. Often you can hear background noises much easier with headphones than without. Play back recordings to check balances between instruments and vocals.
Turn off effects: Some recorder-mixers automatically insert compression or other effects when you record. Make sure they are disabled.
Suggestions for Better Multitrack Recordings
Avoid ground loops: Connect recording equipment, keyboards and instrument amps to the same outlet strips. First make sure that the outlet's circuit breaker can handle the current of all that equipment. Use direct boxes between electric instruments and the mixer, and flip the ground-lift switch to the position where you monitor the least hum.
Use good mics: Borrow or rent some if you don't have any. A basic mic collection includes a cardioid dynamic mic for guitar amps and drums (like a Shure SM57), a small-diaphragm cardioid condenser mic for cymbals and acoustic instruments, and a large-diaphragm cardioid condenser for vocals.
Minimize leakage: In other words, try to make each mic pick up only its own instrument. To do that, mike close with cardioid or supercardioid mics — about 8 inches away or less. Record bass and keys direct. Overdub quiet instruments and vocals after recording the loud instruments. You might place the band members in a circle so that adjacent mics aim away from each other.
Use effective mic placement: Ask your recording engineer how to mike various instruments, or refer to articles and books about that topic. (I've received acoustic-guitar tracks made with the mic close to the sound hole, and had to EQ like crazy to get rid of the boomy sound.)
Suggest that the drummer remove the front head of the kick drum, put a pillow or blanket inside, and use a hard beater to get a tight, snappy beat.
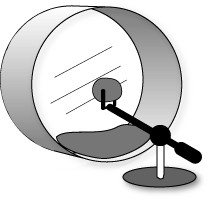
Figure 2. One method of miking a kick drum.
Use a pop filter on vocal mics: To prevent breath pops, place a hoop-type pop filter a few inches in front of a vocal mic. You can improvise one: try a coat-hanger wire curved like a shepherd's crook, with a nylon stocking stretched over the loop. You might use a foam windscreen as a last resort.
Solo and export each recorded track starting from time zero: That way, all the tracks should line up when imported into the studio's mixing software. Disable any effects plug-ins when you export the tracks so that the studio can use only their own plug-ins.
Name each track's wave file by the song and instrument: For example, “Road Runner Blues-lead guitar.wav”. Or “Soul Spice-high harmony 2nd chorus.wav”. That avoids confusion in the studio when it comes time to sort out the tracks.
Ways to Minimize Time in the Studio
Some musicians do want to record in the studio because the sound they get is so much better than they can get at home. They need to know how to make the recording process as efficient as possible so they don't run up a huge bill. You might offer these suggestions:
- Record yourself with a simple DAW or recorder-mixer to work out production ideas at home. See what works and what doesn't so you don't need to experiment in the pro studio.
- Bring lyric sheets and charts with each song's arrangement. Work it out at home, then bring in charts as a memory aid in the studio. Make copies of the lyrics and arrangements for the engineer.
- Consider recording fewer songs. A 10-song album costs about half as much to record as a 20-song album. 10 great songs are better than 20 songs with filler.
- Practice until you can play without mistakes. Obviously, that saves studio time that is spent fixing errors.
- Consider punching-in rather than fixing problem spots with editing. Often it's faster to re-record a botched musical phrase than to correct it with copy-paste edits or volume changes.
- If you have changes you want to make in a mix that you auditioned at home, note the time of each change. Finding a time location is a lot quicker than finding a particular lyric in the second bridge!
Fixing It In the Mix
So far you have advised the band on ways to record well at home. Eventually they will hand you a hard drive, flash card or CDs containing their tracks. It's your job to take those raw recordings, clean them up, and add EQ and effects to make a super mix. Let's go over some tricks to achieve that goal. First we'll clean up the individual tracks.
Delete or mute parts of each track where nothing is playing: Those sections contain leakage and noise. Either slip-edit the beginning and end of each clip, or highlight unwanted sections and delete them. Another method is to use volume envelopes or automated mutes to silence the parts you don't need.
Gate drum tracks to reduce leakage or to tighten up the sound: Here's a typical procedure. Play and solo a tom-tom track that has a gate inserted. Gradually increase the gate threshold until the background leakage goes away, but you still hear the tom hits. Set the attack time fast, like 1 msec, and set the hold time for the desired amount of sustain on each note.
Some gate plug-ins have a setting called “lookahead time”. If you set it to 10 msec, for example, the gate opens 10 msec before the transient hit occurs. That lets you use a longer attack time (rise time) without losing the transient's attack.
Click on the file below to hear a tom-tom track before gating. Because the tom head rings in response to the other instruments, there's a low-frequency “cloud" over the sound. (If the file doesn't play continuously, right-click it and save it to play later.) For best sound play the samples over your studio monitor speakers.
Now click on the file below to hear the same track after gating. All you hear is the tom hit — no ringing, no leakage except during the actual strike.
Another way to achieve the same effect is to delete the audio between the tom hits.
Here's a boomy, hollow-sounding kick drum. Listen to the file below.
Here it is again with gating. Nice and tight.
Highpass filter every track: Insert a highpass (low-cut) filter in a track. Set Q to 1.7 and play the track. Start with the filter frequency at 20 Hz, gradually raise it until the sound thins out, then back off a bit. That removes noise and leakage below the lowest fundamental frequency of each instrument and vocal.
Fix clipped notes: Suppose a kick-drum hit is clipped and sounds crackly. Find the full-amplitude spike where the clipping occurred. Zoom way into the waveform until you can see the individual waves (Figure 3).
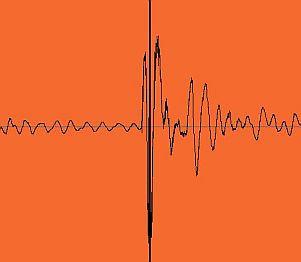
Figure 3. The waveform of a clipped kick-drum signal.
One solution is to delete the clipped waveforms and add short fades into and out of the “hole" that is left (Figure 4).
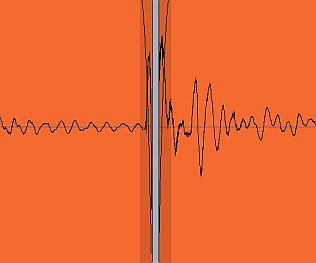
Figure 4. The clipped part of the waveform is deleted.
Another solution is to create a clip (region) of those waveforms and lowpass filter the highs in that region. Some DAWs let you redraw the waveform in a smooth curve to remove the clipping.
Here are audio samples of a clipped kick-drum signal before and after editing:
Filter out hum and hiss: Some EQ plug-ins have a hum-filter preset which inserts a comb filter starting at 50 or 60 Hz. Others have de-noise processing. A simple lowpass (high-cut) filter works well to remove hiss in a guitar-amp track. Try a Q of 1.7, and gradually bring down the filter frequency to the point where the sound gets dull, then back off.
Delete breath pops: Find a pop or thump in the vocal track. Zoom far into the waveform there until you can see the longer wavelength of the pop signal. Then highlight and delete it. Add short fades into and out of the deleted section. It's amazing how well this works.
Enhancing Stereo Recordings
Some musicians record themselves with a portable stereo recorder. Here are some tips to improve a recording made on such a device.
Use an analyzer/EQ program such as Harmonic Balancer: This program can work wonders on stereo mixes that have a bad tonal balance. Har-Bal analyzes and displays the spectrum of a mix so you can pull down any over-emphasized frequencies that color the sound (www.har-bal.com).
Click on the samples below to hear a musician's mix before and after processing with Har-Bal. The song is, Copyrighted 2009 by Tony Chapman.
Cut frequencies below 40 Hz: There might be low-frequency rumble from trucks or air conditioning in the stereo mix.
Maybe add reverb: Homes don't have reverb with a long decay time, so you might add just a little reverb with 1.5 - 2.0 seconds RT60. That gives a more “commercial" feel. Try to filter the lows out of the reverb signal so the bass and kick don't get muddy.
Add compression: If a singer really belts the loud notes, tame them with compression.
Widen or narrow the stereo stage: Plug-ins are available that create mid/side (sum/difference) signals from the left-and-right stereo signals. You can vary the amount of difference signal to expand or shrink the stereo image.
There you have a number of tips to enhance your customers' tracks and to optimize those tracks when they record them. Recording at home and mixing in the studio is becoming more common, so it helps to develop skills for this type of record production.
Articles on the Web
More articles can be found at the following sites:
- sweetwater.com/insync/category/tech-tips/
- prosoundweb.com: Search for Bruce Bartlett. Some articles do not apply to this book.
- l2pnet.com: Search for Bruce Bartlett. Some articles do not apply to this book.
- recordproduction.com/recording-engineer-tips.htm
- Also see the Recording Magazines section in the Learn More tab on this website. Many online magazines post articles from past issues.